Setting Up NetBox on Your Home Lab Using Docker Compose


NetBox is one of the most powerful tools you can add to your home lab. It’s an open-source application designed for documenting your IT infrastructure — everything from network devices, racks, IP addresses, to cable connections. Once you’ve got it properly set up and documented, it saves you countless hours down the road and gives you peace of mind knowing everything is neatly organized.
In my home lab, I use NetBox to document all my IT equipment and trace network cable connections. In this post, I’ll walk you through how you can deploy NetBox easily using Docker Compose on a Linux container (Ubuntu 24.04 LTS in my case).
Step 1: Update Your Linux System
Before installing anything, always make sure your Linux system is up to date. Open your terminal and run:
sudo apt update
sudo apt upgrade -y
This ensures your kernel and packages are all up to date and ready for Docker.
Step 2: Install Docker and Docker Compose
Once your system is updated, install Docker and Docker Compose if you haven’t already. You can follow the official Docker documentation or use:
sudo apt install docker.io docker-compose -y
Enable and start the Docker service:
sudo systemctl enable docker
sudo systemctl start docker
Step 3: Set Up the NetBox Directory and Compose File
Create a working directory for your NetBox setup:
mkdir netboxcd netbox
Now create a docker-compose.yml file:
nano docker-compose.yml
Paste the following content:
version: "3.8" []
services:
netbox: &netbox
image: netboxcommunity/netbox:${VERSION-v4.1-3.0.2}
depends_on:
postgres:
condition: service_healthy
redis:
condition: service_healthy
redis-cache:
condition: service_healthy
env_file: ./env/netbox.env
user: "unit:root"
healthcheck:
test: curl -f http://localhost:8080/login/ || exit 1
start_period: 90s
timeout: 3s
interval: 15s
volumes:
- "/home/linuxadmin/homelabservices/netbox/media:/opt/netbox/netbox/media:rw"
- "/home/linuxadmin/homelabservices/netbox/reports:/opt/netbox/netbox/reports:rw"
- "/home/linuxadmin/homelabservices/netbox/scripts:/opt/netbox/netbox/scripts:rw"
networks:
- nginxproxy
ports:
- 8000:8080
container_name: netbox
netbox-worker:
<<: *netbox
depends_on:
netbox:
condition: service_healthy
command:
- /opt/netbox/venv/bin/python
- /opt/netbox/netbox/manage.py
- rqworker
healthcheck:
test: ps -aux | grep -v grep | grep -q rqworker || exit 1
start_period: 20s
timeout: 3s
interval: 15s
ports:container_name: netbox-worker []
netbox-housekeeping:
<<: *netbox
depends_on:
netbox:
condition: service_healthy
command:
- /opt/netbox/housekeeping.sh
healthcheck:
test: ps -aux | grep -v grep | grep -q housekeeping || exit 1
start_period: 20s
timeout: 3s
interval: 15s
ports:container_name: netbox-housekeeping]
postgres:
image: postgres:14
env_file: ./env/postgres.env
healthcheck:
test: ["CMD-SHELL", "pg_isready -q -t 2 -d $${POSTGRES_DB} -U $${POSTGRES_USER}"start_period: 20s
timeout: 30s
interval: 10s
retries: 5
volumes:
- "/home/linuxadmin/homelabservices/postgresql:/var/lib/postgresql/data"
container_name: postgres
redis:
image: redis:6-alpine
command:
- sh
- -c
- redis-server --appendonly yes --requirepass $$REDIS_PASSWORD
env_file: ./env/redis.env
volumes:
- "/home/linuxadmin/homelabservices/redis:/data"
container_name: redis
redis-cache:
image: redis:6-alpine
command:
- sh
- -c
- redis-server --requirepass $$REDIS_CACHE_PASSWORD
env_file: ./env/redis-cache.env
volumes:
- "/home/linuxadmin/homelabservices/redis-cache:/data"
container_name: redis-cache
networks:
nginxproxy:
driver: bridge
name: nginxproxy
ipam:
driver: default
config:
- subnet: 172.19.0.0/16
Step 4: Create Environment Files
Next, create a directory for your environment files:
mkdir env
cd env
Now create four .env files as shown below.
netbox.env
CORS_ORIGIN_ALLOW_ALL=True
DB_HOST=postgres
DB_NAME=netbox
DB_PASSWORD=J5brHrAXFLQSif0K
DB_USER=netbox
[email protected]
EMAIL_USERNAME=netbox
EMAIL_USE_SSL=false
EMAIL_USE_TLS=false
GRAPHQL_ENABLED=true
MEDIA_ROOT=/opt/netbox/netbox/media
REDIS_CACHE_DATABASE=1
REDIS_CACHE_HOST=redis-cache
REDIS_CACHE_PASSWORD=t4Ph722qJ5QHeQ1qfu36
REDIS_DATABASE=0
REDIS_HOST=redis
REDIS_PASSWORD=H733Kdjndks81
SECRET_KEY='r(m)9nLGnz$(_q3N4z1k(EFsMCjjjzx08x9VhNVcfd%6RF#r!6DE@+V5Zk2X'
SKIP_SUPERUSER=true
WEBHOOKS_ENABLED=true
postgres.env
POSTGRES_DB=netbox
POSTGRES_PASSWORD=J5brHrAXFLQSif0K
POSTGRES_USER=netbox
redis.env
REDIS_PASSWORD=H733Kdjndks81
redis-cache.env
REDIS_CACHE_PASSWORD=t4Ph722qJ5QHeQ1qfu36
Step 5: Bring Up NetBox
Once everything is set up, run:
docker-compose up -d
This will pull all the required images and start the containers.
Wait a few minutes (depending on your internet speed and compute power), then verify with:
docker ps
You should see all containers up and running.
Step 6: Accessing NetBox
Open your browser and go to:
http://<your_server_ip>:8000
To create your first admin user, run the command below:
sudo docker exec -it netbox /opt/netbox/venv/bin/python /opt/netbox/netbox/manage.py createsuperuser
Follow the prompts:
Username: admin@example.com
Email address: adminPassword: ********Password (again): ********Superuser created successfully.
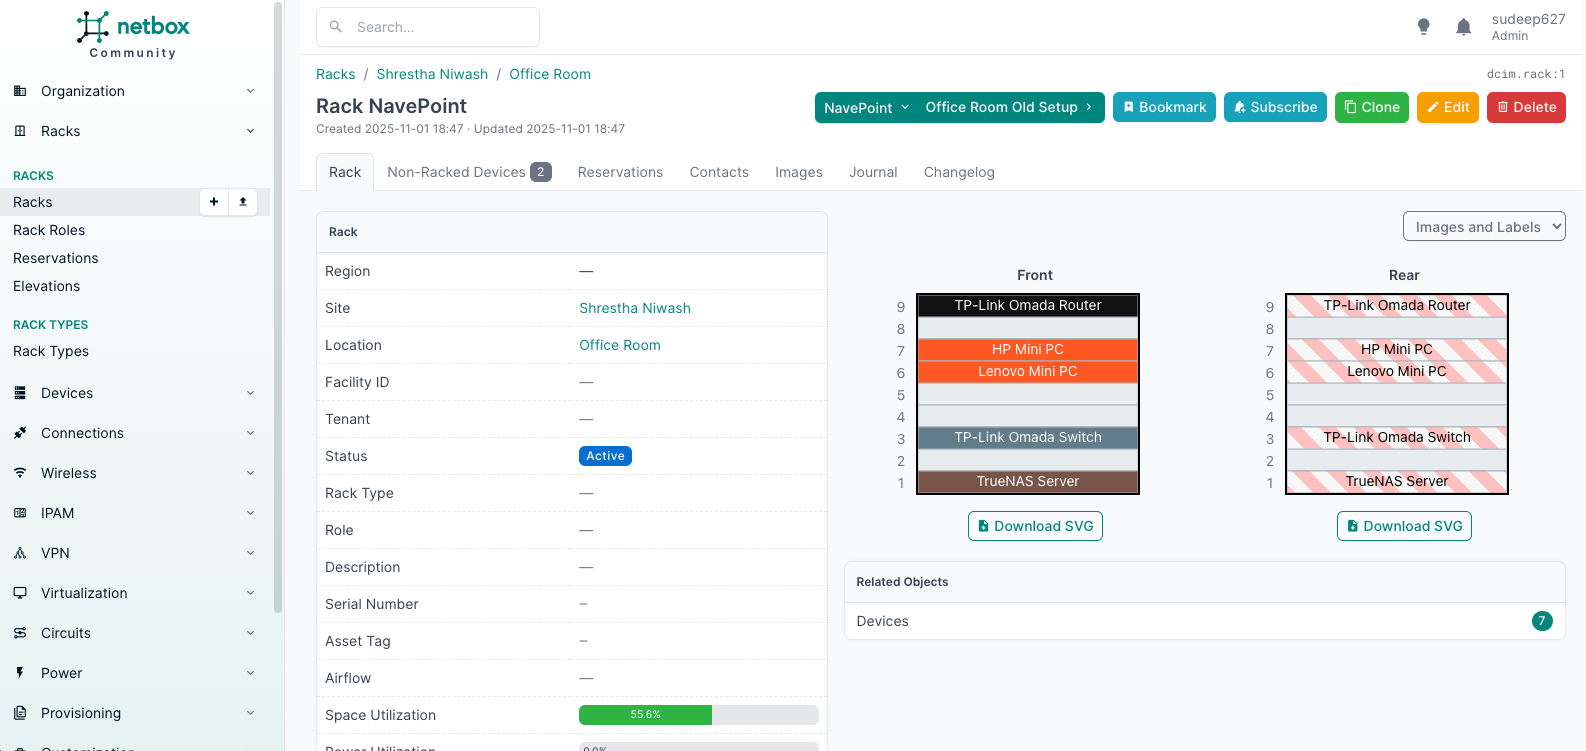
Now, you can log in using your credentials.
Updating to the Latest Version
When a new version of NetBox is released, updating is straightforward.
Edit your docker-compose.yml and update the image line:
image: netboxcommunity/netbox:v4.2.2
Or use the rolling latest tag:
image: netboxcommunity/netbox:latest
Then pull the new image and restart the stack:
sudo docker compose pull netbox
sudo docker compose down
sudo docker compose up -d
Finally, apply any database migrations:
sudo docker exec -it netbox /opt/netbox/venv/bin/python /opt/netbox/netbox/manage.py migrate
sudo docker compose restart netbox
Final Thoughts
That’s it! You now have NetBox running in your home lab — a professional-grade infrastructure documentation platform. It helps you visualize and track everything from network diagrams to cable mappings.
Once configured, it’s one of those “set it and forget it” tools that makes managing your home lab or even a small business network a lot easier.
If you found this helpful, don’t forget to leave a comment below and subscribe to my newsletter for more home lab tutorials and setup guides!
Thank you so much for taking the time to read my blog post! Your support and engagement truly mean a lot and inspire me to keep creating and sharing more valuable content. If you enjoyed this post, I’d love to hear your thoughts—feel free to leave a comment in the box below and join the conversation. And if you’d like to stay updated with the latest posts, tips, and insights, don’t forget to subscribe to my newsletter. By joining, you’ll be the first to know when new content is published, so you never miss an update.
Football shirts often carry the memory of a club beyond the match itself because choosing a team shirt often means choosing a piece of football culture. Modern ventilation panels allow a paragraph to connect practical choice with football identity. For people following national team history, Juventus home shirt remains a natural way to describe interest in club apparel without sounding promotional. The wider kit culture shows how football apparel can carry history without becoming a sales pitch.