Let’s Learn About DNS: How It Works, How ISPs Track You, and How to Protect Your Privacy


When you type a website address into your browser — like google.com — your computer doesn’t magically know where that site lives. Behind the scenes, something called DNS (Domain Name System) acts like the phonebook of the internet, translating human-friendly domain names into IP addresses that computers use to find each other.
For example:
- You type
www.example.com - DNS translates it to something like
93.184.216.34 - Your browser connects you to the website
Without DNS, you’d need to remember long strings of numbers instead of simple names.
How ISPs Use DNS to Collect Data
Your ISP (Internet Service Provider) usually controls the DNS server your devices use by default. This means:
- Every time you type a website address, your ISP sees where you’re going.
- They can log your browsing habits, creating a profile of your interests.
- Many ISPs sell this data to advertisers for targeted ads or share it with third parties.
Even if a website is encrypted with HTTPS, your ISP still knows what domains you visit because DNS requests aren’t encrypted by default.
How to Protect Your Privacy
The good news: you don’t have to stick with your ISP’s DNS. You can switch to a privacy-focused DNS provider that doesn’t log or sell your browsing history. Even better, some DNS services support DNS over HTTPS (DoH) or DNS over TLS (DoT), which encrypt your DNS requests so they can’t be intercepted by your ISP.
Steps to improve privacy:
- Change your device’s DNS settings (on your computer, router, or phone).
- Use encrypted DNS protocols when possible.
- Consider using a VPN for complete traffic encryption.
Popular Privacy-Friendly DNS Providers
Here are some trusted DNS alternatives:
- Google Public DNS –
8.8.8.8and8.8.4.4(fast, but logs some data for performance and security). - Cloudflare DNS –
1.1.1.1and1.0.0.1(privacy-focused, promises not to sell data). - OpenDNS (Cisco) –
208.67.222.222and208.67.220.220(offers content filtering and security features). - Quad9 –
9.9.9.9(blocks malicious domains, strong privacy policy). - AdGuard DNS –
94.140.14.14and94.140.15.15(blocks ads and trackers).
Step-by-Step: How to Change Your DNS Settings
Here’s how you can switch your DNS depending on the device you use.
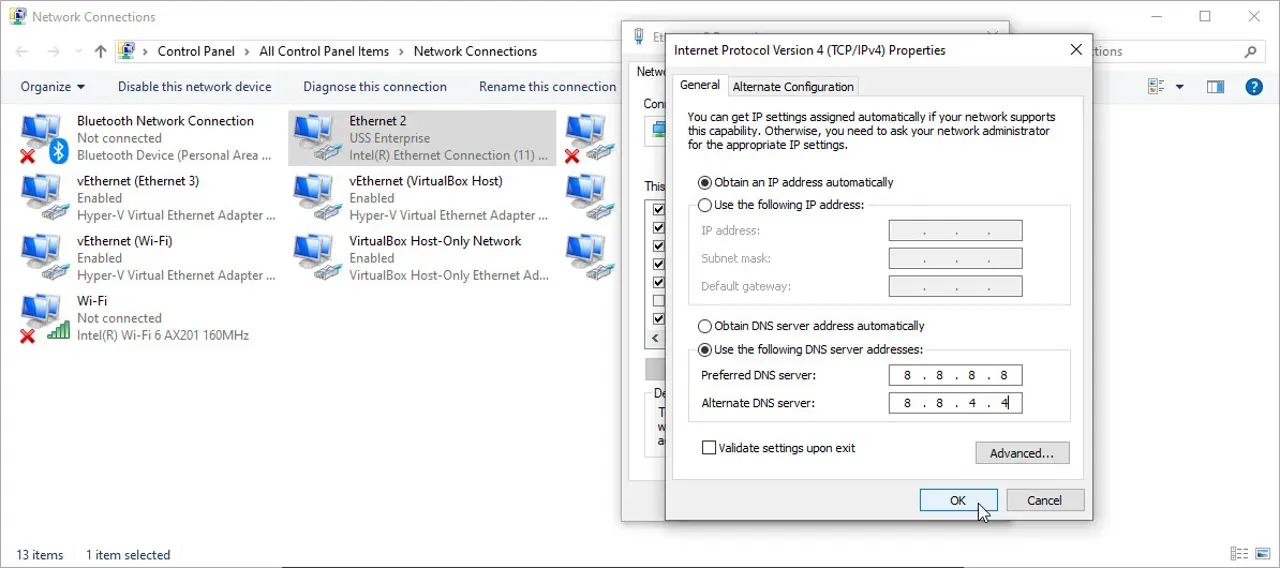
🔹 Windows 10/11
- Open Settings > Network & Internet
- Select Wi-Fi (or Ethernet if wired) → click Properties
- Scroll to IP settings and click Edit
- Change from Automatic (DHCP) to Manual
- Enable IPv4 and enter your preferred DNS (e.g.,
1.1.1.1and1.0.0.1) - Save changes
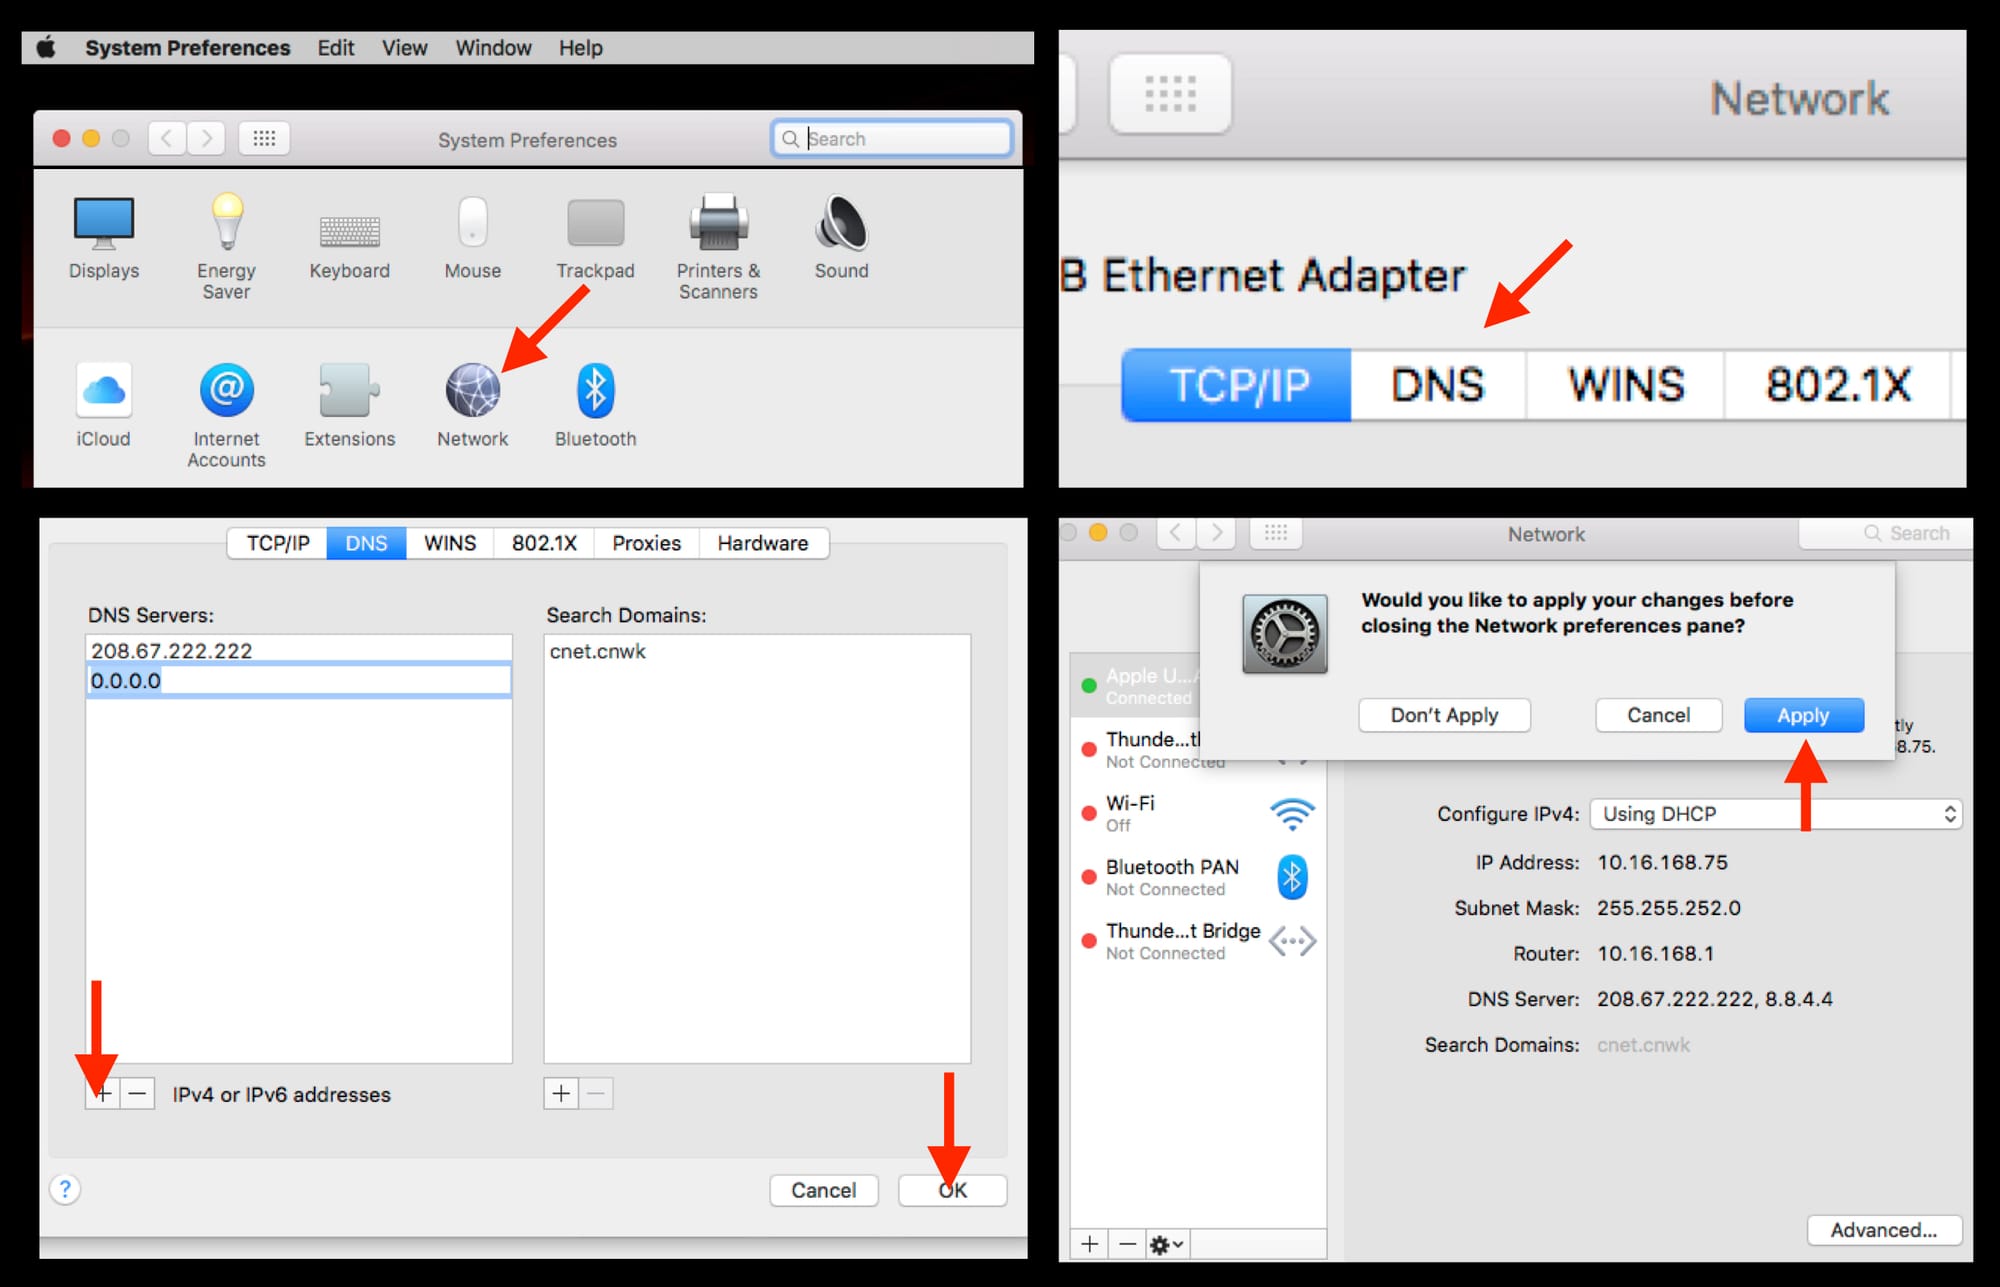
🔹 macOS
- Go to System Settings > Network
- Select your Wi-Fi or Ethernet connection → Details
- Click DNS from the left sidebar
- Add your custom DNS addresses (e.g.,
9.9.9.9) - Click OK and then Apply
🔹 Router (Applies to All Devices in Home) Expert Users Only
Note: Router DNS Setting differs on what brand of Router you use.
- Log in to your router’s web interface (usually
192.168.1.1or192.168.0.1) - Find the Internet/WAN Settings section
- Look for DNS Server Settings
- Replace your ISP’s DNS with your chosen provider’s (e.g.,
94.140.14.14and94.140.15.15) - Save and restart the router
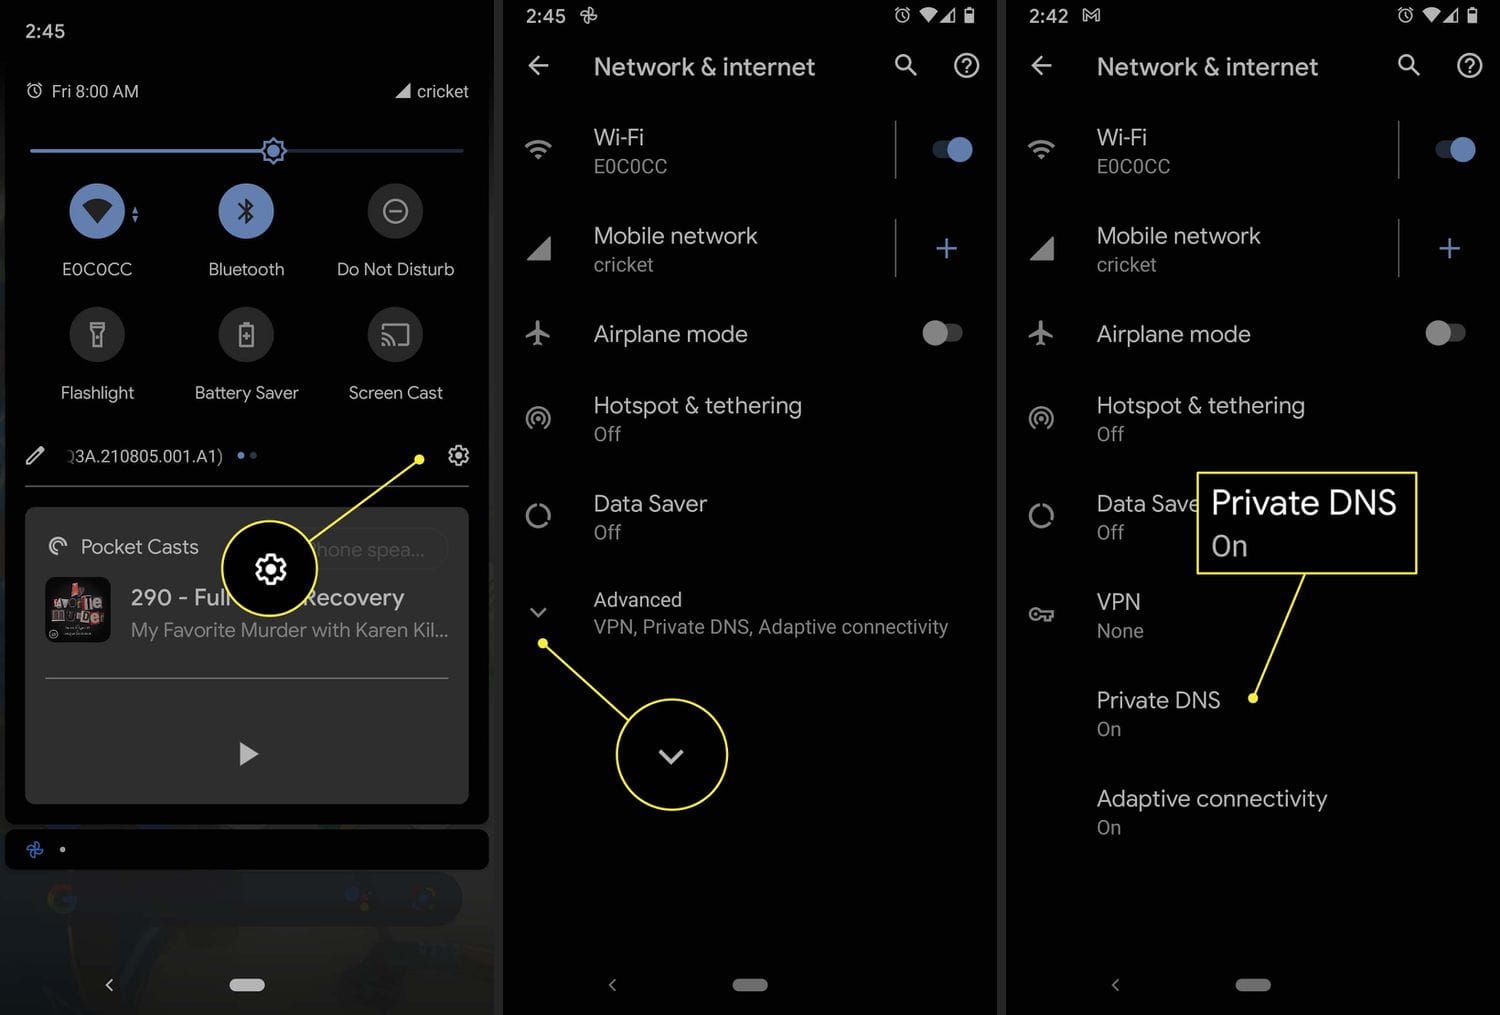
🔹 Android
- Open Settings > Network & Internet > Internet
- Tap your Wi-Fi network → Advanced > Private DNS
- Select Private DNS provider hostname
- Enter (e.g.,
dns.cloudflare.comfor Cloudflare DoH) - Save and reconnect
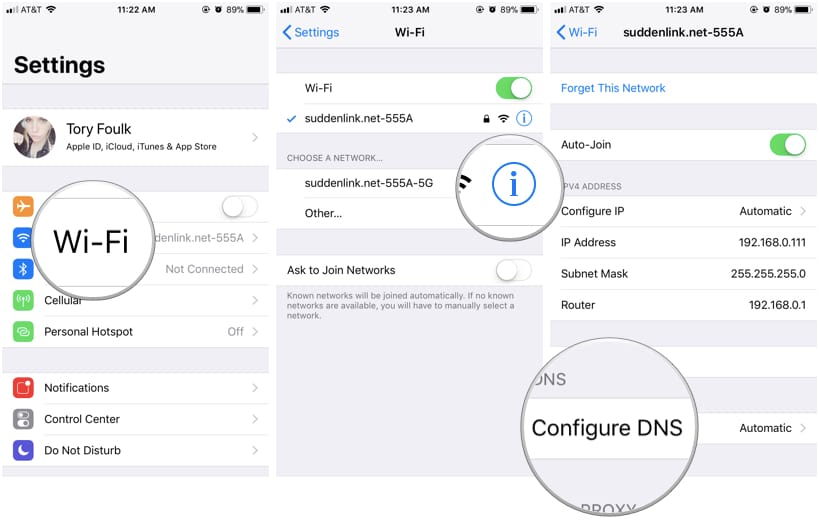
🔹 iPhone / iPad
- Go to Settings > Wi-Fi
- Tap the i next to your network
- Scroll to Configure DNS → select Manual
- Delete old DNS servers, then add new ones (e.g.,
1.1.1.1and1.0.0.1) - Save changes
You can even self-host your own DNS server at home using AdGuard Home, which not only helps keep your browsing private but also blocks annoying ads and trackers on the websites you visit.

Final Thoughts
DNS is the backbone of the internet, but your ISP may be using it to track and profit from your browsing behavior. By switching to a secure, privacy-focused DNS provider and enabling encryption, you can take control of your data and enjoy a safer, more private internet experience.
Thank you so much for taking the time to read my post! Your support and engagement truly mean a lot and inspire me to keep creating and sharing more valuable content. If you enjoyed this post, I’d love to hear your thoughts—feel free to leave a comment in the box below and join the conversation. And if you’d like to stay updated with the latest posts, tips, and insights, don’t forget to subscribe to my newsletter. By joining, you’ll be the first to know when new content is published, so you never miss an update.
Collectors often read football history through collars, sponsors, badges, and colour patterns especially when supporters associate it with a title race or a European night. Fans following Boca Juniors may notice how badges, collars, and sponsor layouts change the feel of a kit. For collectors looking at classic seasons, football shirt fit comparison remains a natural way to describe interest in club apparel without sounding promotional. The appeal of a football shirt makes room for both modern technology and older football memories.