Importance of VPN and How to Set Up Your Own Private VPN Using PiVPN on Raspberry Pi or Home Lab


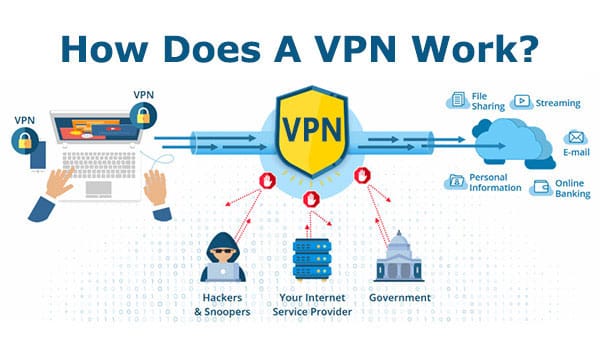
In today’s connected world, online privacy and security have become more important than ever. Every time you browse the internet, your activity may be visible to your internet service provider (ISP), advertisers, and sometimes even hackers sniffing on public Wi-Fi networks. This is where a Virtual Private Network (VPN) comes in.
A VPN encrypts your internet traffic and routes it through a secure tunnel, ensuring that your data stays private and protected. While many commercial VPN providers are available, setting up your own private VPN server gives you full control over your data without relying on a third-party provider.
One of the simplest and most affordable ways to host your own VPN is by using PiVPN, a lightweight VPN installer for devices like the Raspberry Pi or your home server.
Why is a VPN Important?
- Privacy Protection – Keeps your browsing activity hidden from your ISP and advertisers.
- Security on Public Wi-Fi – Protects your sensitive data (like logins, banking info, emails) when connected to public hotspots.
- Remote Access – Allows you to securely connect back to your home network and access your files or devices from anywhere in the world.
- Bypass Geo Restrictions – Lets you access your home country’s services even when traveling abroad.
- Data Ownership – When you host your own VPN, you don’t have to trust a third-party provider with your browsing data.
What is PiVPN?
PiVPN is a simple script that helps you install and configure a VPN (either WireGuard or OpenVPN) on your device in just a few steps. It is designed to work on Raspberry Pi, but you can also install it on any Linux-based home server or virtual machine in your homelab.
- WireGuard is faster and more lightweight, ideal for modern use.
- OpenVPN is widely supported and more traditional but slightly slower.
Both options are excellent, and PiVPN makes it easy to set them up.
What You Need
- A Raspberry Pi (any model with internet access) or a Linux-based home server/VM
- Raspberry Pi OS / Ubuntu installed
- A static IP address on your home network (or set up Dynamic DNS if your ISP changes your IP)
- Basic command-line knowledge
- A router with port forwarding enabled (to allow external VPN connections)
Step-by-Step Guide to Setting Up PiVPN
1. Update Your System
First, update your Raspberry Pi or home server:
sudo apt update && sudo apt upgrade -y
2. Install PiVPN
Run the installation script:
curl -L https://install.pivpn.io | bash
3. Follow the Setup Wizard
- Choose between WireGuard or OpenVPN (WireGuard is recommended).
- Select a local user profile for configuration.
- Set the listening port (default is fine, but you can change it if needed).
- Configure DNS provider (you can use Google, Cloudflare, or your own Pi-hole if available).
- The script will configure your VPN server automatically.
4. Configure Router Port Forwarding
Login to your router and forward the VPN port (default: 51820 for WireGuard, 1194 for OpenVPN) to your Raspberry Pi or server’s internal IP address.
5. Create VPN Profiles
Generate profiles for each device you want to connect:
pivpn add
This will create a configuration file (.conf for WireGuard or .ovpn for OpenVPN).
6. Import VPN Profile on Devices
- For WireGuard, copy the
.conffile and import it into the WireGuard app (available for Windows, macOS, Linux, iOS, and Android). - For OpenVPN, import the
.ovpnfile into the OpenVPN client.
NOTE : Import Profile can be done via scanning QR Code, simply run the command pivpn -qr # To view the user’s QR code , Scan QR Code to add Profile on the device you want to connect.
7. Connect and Verify
Once connected, go to whatismyipaddress.com and check if your IP address is your home server’s IP. If yes, your VPN is working!
Bonus Tip: Combine PiVPN with Adguard Home
If you already use Adguard Home as your network-wide ad blocker, you can integrate it with PiVPN. This way, even when you’re away from home, all your devices benefit from ad blocking and DNS filtering through your VPN connection.

Conclusion
Running your own private VPN server with PiVPN on a Raspberry Pi or home lab setup is not only a great way to protect your online privacy but also an excellent learning experience for self-hosting. With minimal cost and effort, you gain full control over your data, secure remote access to your home network, and the satisfaction of owning your digital privacy.
Thank you so much for taking the time to read my Post! Your support and engagement truly mean a lot and inspire me to keep creating and sharing more valuable content. If you enjoyed this post, I’d love to hear your thoughts—feel free to leave a comment in the box below and join the conversation. And if you’d like to stay updated with the latest posts, tips, and insights, don’t forget to subscribe to my newsletter. By joining, you’ll be the first to know when new content is published, so you never miss an update.