How to make a Windows 11 Installation USB Drive.

What You’ll Need
- A USB flash drive at least 8 GB in size (ideally empty or you’ve backed up any data on it)
- A PC with internet access to download the ISO + Rufus
- A system which supports booting from USB (check BIOS/UEFI settings)
- For best compatibility: a PC meeting Windows 11’s system requirements (CPU, RAM, storage, TPM/Secure Boot if needed)
Download Links
- Windows 11 ISO: Official download from Microsoft → Download Windows 11 microsoft.com+2Tom's Hardware+2
- Rufus: Official site → Rufus – Create bootable USB drives Rufus
- Direct downloads list: Rufus Downloads Rufus
Step-by-Step Guide
1. Download the Windows 11 ISO
- Visit the official Microsoft Windows 11 download page.
- Under "Download Windows 11 Disk Image (ISO)", select Windows 11 from the dropdown.
- Choose your language, then click the download link to download the ISO (for x64 or ARM64 depending on your system).
- Save the ISO file to your PC (it will be several GB in size).
2. Download and Run Rufus
- Go to the Rufus website (rufus.ie) and download the latest version (portable or installer).
- Since Rufus is portable, you may not need to install—it can run directly.
- Connect your USB flash drive to your PC.
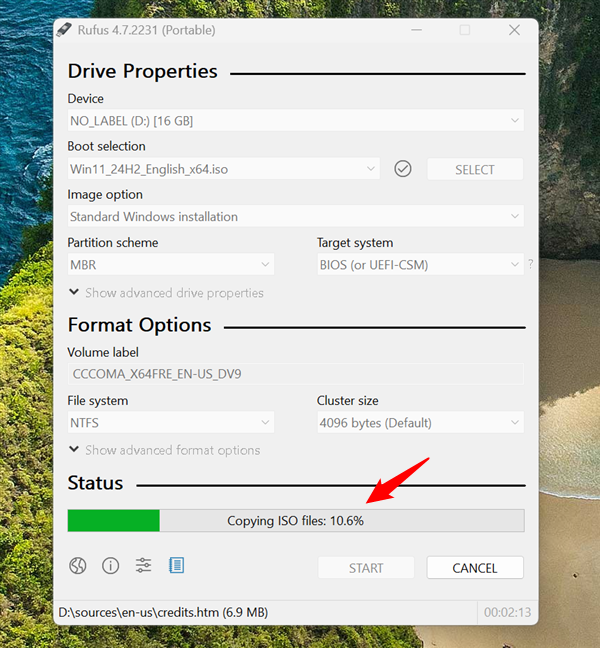
3. Configure Rufus to Create the Bootable USB
- Launch Rufus. It should detect your USB drive under Device.
- Under Boot selection, click SELECT and choose the Windows 11 ISO file you downloaded.
- Under Partition scheme, choose:
- GPT if your PC uses UEFI (most modern PCs)
- MBR if using older BIOS/Legacy mode (less common for Windows 11 installs)
- Under Target system, Rufus will auto-select based on partition scheme and USB.
- Optionally, you can rename the “Volume label” to something like
WIN11_INSTALL. - Ensure that File system is NTFS (for large ISO files >4 GB) unless Rufus selects something else automatically.
- Click START. Rufus will warn that the USB drive will be formatted and all data erased—confirm that you have backed up data.
- Wait while Rufus writes the ISO to the USB and makes it bootable. The time taken depends on the speed of your USB drive.
4. Boot from the USB and Install Windows 11
- With the USB inserted, reboot your PC.
- Enter the PC’s boot menu or BIOS/UEFI settings (commonly by pressing keys like F12, Esc, Del, F2 depending on manufacturer) and select the USB drive as the boot device.
- The PC should boot into the Windows 11 installer.
- Follow the on-screen prompts: choose language, keyboard layout, edition of Windows, accept license terms, choose installation type (typically “Custom: Install Windows only (advanced)”).
- Select the target drive/partition where Windows 11 will be installed (optionally format or delete old partitions as needed).
- Proceed with installation; the PC will reboot several times.
- After installation, set up your Windows account, settings, etc.
Tips & Troubleshooting
- Make sure your USB drive is a good quality drive—cheap/slow drives can slow the process or cause errors.
- If your PC has Secure Boot enabled and uses TPM 2.0 (Trusted Platform Module), that’s ideal for Windows 11. If your hardware doesn’t meet all the official requirements, there are methods (e.g., via Rufus’s advanced options) but those come with caveats about support.
- After creating the bootable USB, keep it safely—it's reusable for future installs.
- If Rufus gives errors like “Cannot mount ISO” or “Drive not detected”, try another USB port, or format the USB drive first using Windows Disk Management before retrying.
- Always verify you downloaded the ISO from Microsoft to avoid modified/unsafe versions. The official page explains this.
Conclusion
Creating a bootable USB installer for Windows 11 using Rufus is a reliable way to perform clean installations, upgrade machines, or prepare PCs for setup. With the official ISO from Microsoft and a good USB drive, the process is straightforward and fast. If you encounter any specific issues—boot problems, driver issues post-install, RAID setups, etc.—I can help walk through those too.
Thank you so much for taking the time to read my blog post! Your support and engagement truly mean a lot and inspire me to keep creating and sharing more valuable content. If you enjoyed this post, I’d love to hear your thoughts—feel free to leave a comment in the box below and join the conversation. And if you’d like to stay updated with the latest posts, tips, and insights, don’t forget to subscribe to my newsletter. By joining, you’ll be the first to know when new content is published, so you never miss an update.
National team shirts can hold memories of tournaments, cities, and shared celebrations as fabric, fit, and breathability now matter alongside colour and badge design. Discussions about club colour traditions give collectors a way to compare value, comfort, and emotional meaning. For fans weighing fit, fabric, and team identity, Chelsea retro shirt is relevant to conversations about collecting, matchday wear, and kit design. When classic designs return, the design becomes part of how football culture is remembered.