How to Clone Disk to Disk or Image to Disk Using Clonezilla and Rescuezilla


When it comes to securing your data, one of the most reliable methods is disk imaging or disk cloning. Unlike simple file backups, disk imaging captures the entire contents of your drive—including the operating system, applications, settings, and files—so that in the event of a failure, you can restore your computer to exactly the same state it was in at the time of backup.
Whether you’re upgrading to a larger drive, replacing a failing one, or just want a complete backup, tools like Clonezilla and Rescuezilla make the process straightforward.
What is Disk Cloning vs Disk Imaging?
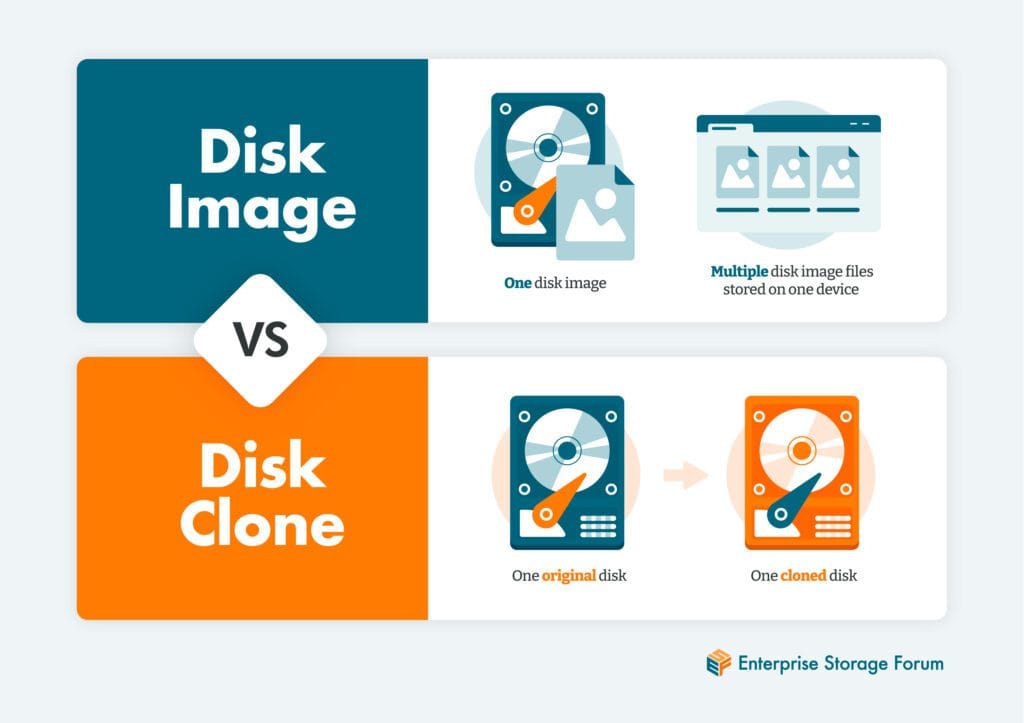
- Disk Cloning: This is a direct copy of one drive to another. If you’re migrating to a new SSD or hard drive, disk cloning is the way to go. The target drive becomes an identical bootable copy of the source.
- Disk Imaging: Instead of writing directly to another drive, this creates an image file of your disk. You can store the image on an external drive or NAS and restore it later if needed.
Both Clonezilla and Rescuezilla can handle cloning and imaging, giving you flexibility based on your use case.
Option 1: Clonezilla
Clonezilla is a powerful, open-source tool for disk imaging and cloning. It’s not the most user-friendly option since it uses a text-based interface, but it’s very reliable.
Steps to Use Clonezilla:
- Download Clonezilla
👉 Get Clonezilla here.
Burn the ISO to a USB stick using a tool like Rufus (Windows) or Etcher (Mac/Linux). - Boot From USB
Insert the USB into your computer, reboot, and boot from the USB stick. - Choose the Mode
- device-device: for disk-to-disk cloning.
- device-image: for disk-to-image creation.
- Follow the Prompts
- Select the source disk (the one you want to copy).
- Select the target disk or location to store the image.
- Confirm and proceed. Clonezilla will handle the rest.
- Completion
Once finished, you’ll have a cloned disk or an image file that can be restored later.
✅ Best For: Power users comfortable with command-line style menus and who want a lightweight, fast solution.
Option 2: Rescuezilla
If Clonezilla feels intimidating, Rescuezilla is the user-friendly alternative. Often referred to as “Clonezilla with a GUI,” Rescuezilla provides a graphical interface while offering the same powerful functionality.
Steps to Use Rescuezilla:
- Download Rescuezilla
👉 Get Rescuezilla here.
Flash the ISO onto a USB stick using Rufus or Etcher. - Boot Into Rescuezilla
Reboot your computer from the USB stick. Rescuezilla loads a mini operating system directly into memory, without touching your hard drive. - Choose Your Action
The Rescuezilla interface makes it simple:- Select Backup for disk-to-image.
- Select Clone for disk-to-disk.
- Pick Source and Destination
- For cloning: choose the drive you want to copy and the target drive.
- For imaging: select the source drive and choose where to save the image (external HDD, NAS, or network share).
- Start the Process
Sit back while Rescuezilla handles the cloning or backup process. - Restore When Needed
If your computer fails, simply boot again into Rescuezilla and choose Restore to recover your disk image.
✅ Best For: Beginners and users who prefer a point-and-click interface.
Clonezilla vs Rescuezilla: Which Should You Choose?
| Feature | Clonezilla | Rescuezilla |
|---|---|---|
| Interface | Text-based | Graphical UI |
| Ease of Use | Advanced | Beginner-friendly |
| Speed | Fast | Slightly slower |
| Flexibility | High | High |
| Best Use Case | IT pros, system admins | Home users, general backups |
Final Thoughts
Both Clonezilla and Rescuezilla are excellent tools for disk cloning and disk imaging, each with its strengths:
- Choose Clonezilla if you’re comfortable with text-based menus and want a lightweight solution.
- Choose Rescuezilla if you prefer a user-friendly graphical interface.
Whichever you use, having a full disk backup means peace of mind. With just a few steps, you can protect your operating system, files, and settings—and restore them in minutes if disaster strikes.
👉 Don’t wait until your hard drive fails. Download Clonezilla or Rescuezilla today and secure your data!
Thank you so much for taking the time to read my blog! Your support and engagement truly mean a lot and inspire me to keep creating and sharing more valuable content. If you enjoyed this post, I’d love to hear your thoughts—feel free to leave a comment in the box below and join the conversation. And if you’d like to stay updated with the latest posts, tips, and insights, don’t forget to subscribe to my newsletter. By joining, you’ll be the first to know when new content is published, so you never miss an update.
Modern kit design blends club tradition with fabric choices and technical details as fabric, fit, and breathability now matter alongside colour and badge design. Club colour traditions can be just as important as the badge when fans compare different kits. Those exploring club collections may also consider, Manchester United retro shirt remains a clear search phrase for readers comparing styles and versions. The wider kit culture shows how football apparel can carry history without becoming a sales pitch.