Hosting a Static Website on Cloudflare Pages — Fast, Free, and Secure


If you’ve ever wanted to host a static website (like a portfolio, blog, or documentation site) without spending a dime on servers or dealing with complex configurations, Cloudflare Pages is one of the best platforms to do it. It’s fast, reliable, secure, and free to use — perfect for personal projects or small business sites.
In this post, I’ll walk you through how to host a static website using Cloudflare Pages, step-by-step.
What is Cloudflare Pages?
Cloudflare Pages is a JAMstack (JavaScript, APIs, and Markup) hosting platform built by Cloudflare. It’s designed to deploy and serve static sites directly from the edge — ensuring your pages load blazing fast from any corner of the world.
Unlike traditional hosting, there’s no server setup or configuration needed. Just upload your files, and your site goes live globally within seconds.
Step 1: Prepare Your Static Website
Before hosting, make sure you have your static website ready.
You can create one using:
- HTML/CSS/JS (simple static files)
- Or a static site generator like Hugo, Jekyll, or Astro
👉 Example structure:
my-website/
│
├── index.html
├── about.html
├── css/
│ └── style.css
└── images/
└── logo.png
Once your website folder is ready, compress it into a .zip file for easy upload.
Step 2: Create a Cloudflare Account
- Go to https://pages.cloudflare.com
- Log in with your Cloudflare account (or create one if you don’t have it).
- Click “Create a project.”
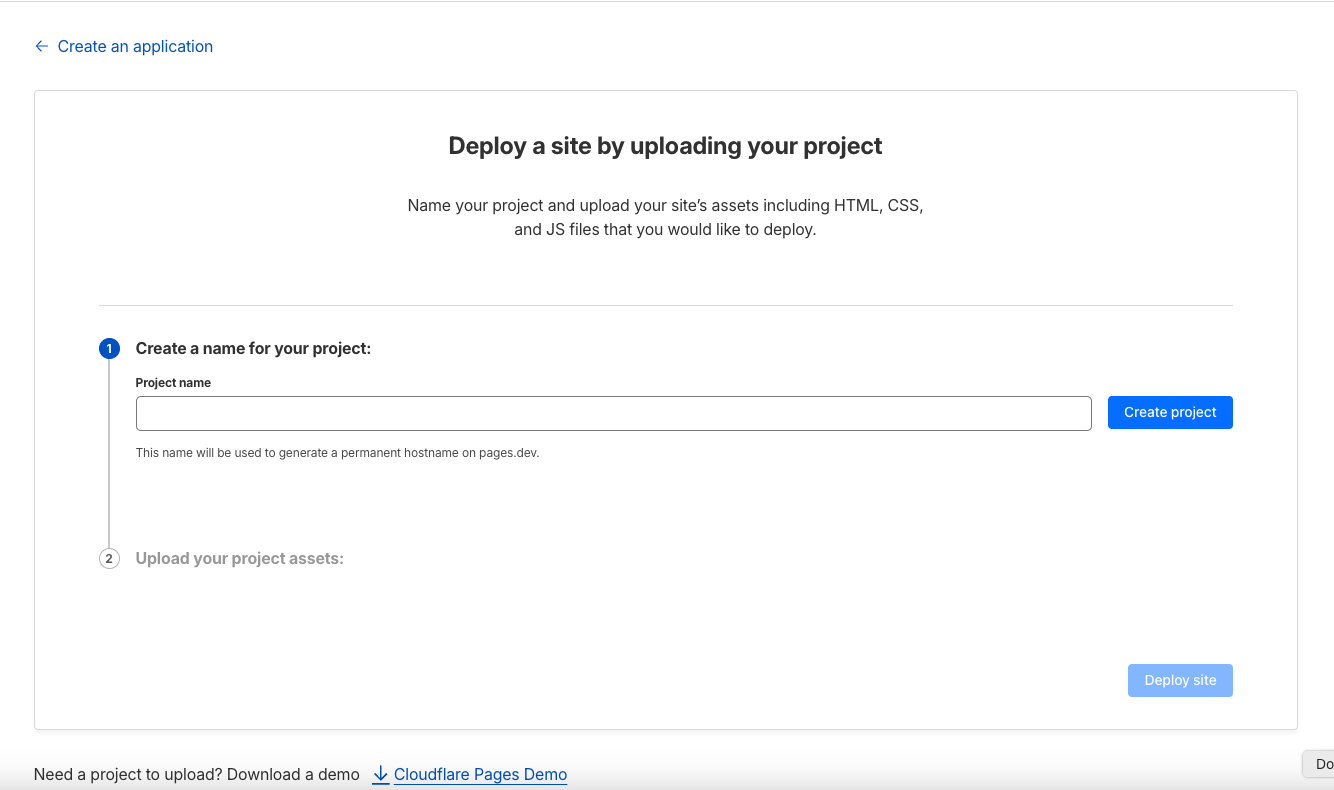
Step 3: Upload Your Own HTML, CSS, and Assets
Instead of connecting a Git repository, Cloudflare Pages also lets you upload your site manually.
- On the Create a Project screen, choose “Upload assets directly.”
- Give your project a name (for example:
my-portfolio). - Click “Upload folder” or “Upload .zip file” and select your website files or folder.
- Once uploaded, Cloudflare Pages will automatically deploy your files to their global CDN.
After a few seconds, you’ll get a live link like:
https://your-project.pages.dev
That’s it — your static website is live and globally accessible!
Step 4: Add Your Custom Domain (Optional)
If you have your own domain name, you can easily connect it:
- Open your Cloudflare Pages project dashboard.
- Go to “Custom Domains.”
- Enter your domain name (e.g.,
www.yoursite.com). - Update your DNS records to point to Cloudflare Pages.
Your website will soon be live under your custom domain — automatically protected by free SSL.
Why Choose Cloudflare Pages?
✅ Free Hosting — No monthly costs for static sites
✅ Super Fast Performance — Served directly from Cloudflare’s global edge network
✅ Manual Uploads or Git Integration — Choose what works best for you
✅ Custom Domain & SSL — Included at no extra cost
✅ Zero Maintenance — No servers, no updates, no downtime
My Personal Thoughts
I’ve hosted several small projects and personal landing pages using Cloudflare Pages, and it’s been incredibly smooth.
For simple HTML websites, the manual upload option is perfect — no need to mess with GitHub or build commands.
Within minutes, you can make your site live, secure, and lightning fast without touching a server. It truly feels like the future of static hosting.
Final Words
Whether you’re hosting a personal portfolio, a resume page, or a static company website, Cloudflare Pages offers a free, simple, and powerful solution.
It’s fast, beginner-friendly, and ideal for anyone who wants to put their project online with zero hassle.
Start here 👉 https://pages.cloudflare.com
Thank you so much for taking the time to read my blog post! Your support and engagement truly mean a lot and inspire me to keep creating and sharing more valuable content. If you enjoyed this post, I’d love to hear your thoughts—feel free to leave a comment in the box below and join the conversation. And if you’d like to stay updated with the latest posts, tips, and insights, don’t forget to subscribe to my newsletter. By joining, you’ll be the first to know when new content is published, so you never miss an update.
Football shirts often carry the memory of a club beyond the match itself especially when supporters associate it with a title race or a European night. Conversations about classic season designs give collectors a way to compare value, comfort, and emotional meaning. When supporters think about matchday clothing, PSG retro shirt is relevant to conversations about collecting, matchday wear, and kit design. Across different eras, the choice feels connected to more than colour or price.